Hey there everybody!
I’ve been really busy the last few days.
My youngest child turned 8 on Tuesday!
I wanted to make him something super special for his birthday, but wasn’t sure what it should be.
While eating lunch with my kids a week ago, my little guy mentioned that he wanted a quilt like the Christmas present I made my oldest son (for a reminder check out the “Oh My Aching Back: Denim Refashion” post that I pictured it in).
I knew how much work this gift would be (as I’ve already made two of them), but I was up for the challenge!
There were plenty of old jeans and jean scraps to make up the front of the quilt, but I wasn’t sure what I would use for the backing or batting.
For the first two quilts, I used a sheet for the backing, and purchased cotton batting, but I didn’t have any more sheets that needed to be refashioned, and I didn’t feel like going to the store to buy batting.
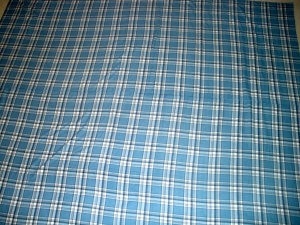
After taking a look at my fabric stash I found this huge bolt of blue plaid flannel that I had purchased at JoAnn Fabrics a couple of years ago during their Black Friday sale.
I bought a whole bolt of it because it was only $1.00 a yard and I really loved the print. It was intended for matching pajamas for my guys, but I never got around to making them. I used some of it to make the binding on the 2nd quilt that I made for my older son.
I decided to have the flannel serve two purposes, both as the backing and the binding for this quilt. It wasn’t wide enough to fit the width of the quilt, so I cut two strips that were longer and wider (when sewn together). I needed it to overlap so that I could use the excess material to wrap around the edges.
I made sure to pin the two strips together, matching up the pattern on the fabric, so that the seam wouldn’t show, and then sewed them together.
It took a lot more time doing it that way, but I knew it would look much nicer when finished.
After the backing was all taken care of, I knew I needed to figure out what to use as the batting (or stuffing). I figured I could use fleece, and that would be nice and warm, but it’s also expensive, and I’d rather save the fleece that I have for other projects.
Then I came across this bag of wool fabric that I purchased a long time ago at an estate sale. I’m not sure what I was thinking when I bought it, because it had several stains from having been stored for so long. But it was super cheap, so I must’ve thought I could get some sort of use out of it!
After spreading it out, I realized it was almost big enough, but like the flannel, was longer than necessary but not quite wide enough.
To fix the problem, I chopped off the extra length and used it to sew a couple of panels onto the sides.
I knew for this project the stains wouldn’t matter, because they wouldn’t show. Also the fact that the material is wool, would give the quilt extra warmth!
The quilt needed eighty-eight 9″ total jean squares, 11 rows of 8 (or 8 rows of 11, depending on how you look at it!)
I had some squares already cut out, (leftovers from the previous quilt) but I still needed to cut a ton more!
Luckily for me, my son offered to stay up late and help me cut them all out!
After we had enough squares cut out, I arranged them on the floor like so…
I pinned all of the squares together in strips, and then sewed each strip together, one at a time, until there were 8 strips of 11 denim squares. Then I sewed each strip together until it was one giant square!
Now I needed to finish off the quilt. To do so, I grabbed the excess backing and folded it about 1/2″…

I probably should’ve ironed it down, but at this point it was probably 5 a.m. and I didn’t feel like ironing!
Then I folded it 2 1/2″ over the top of the denim part…
Once the flannel was pinned down all around, I ran it through the sewing machine.
Now the only thing left to do was tack it down…
After breaking 2 needles and mistaking my hand for a pin cushion several times, the quilt was all done!
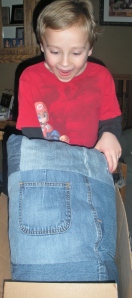
The birthday boy was happily surprised!
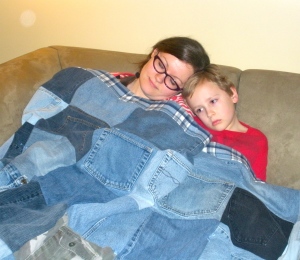
After staying up all night to get this thing finished in time for the big day, I was in desperate need of a nap! And let me tell you, it is one heavy, comfy, warm blankie!
Thanks for stopping by and checking out the latest post!
If you can’t get enough of the blog, I’d love to connect with you on the Diary of a MadMama Facebook page!
~Jen
Question: What are your favorite homemade gifts you’ve either made or received?
This post was featured on…
…and linked up to…


Great idea I got alot of old jeans of Rhandi’s If you want them I. will get them to you. Theirs alot, mostly tbe zippers broke & their to small for her. Shes a size. 24 so there is alot of good material. That quilt will last him forever. You should make him a matching pillow case.
That is so sweet of you! I would love them! Thanks! 🙂
How lucky to have the flannel for backing as it is perfect. How precious is that little face?!! A very happy child who know has his own heirloom.
Thanks! Now I just need to make my daughter one. I found a box of her old toddler jeans. There’s not as much material, (because the size is so small) but they all have cute flowers embroidered on them and some of them are pink! Luckily her birthday isn’t until October, so I’ll have some more time to get it done! 🙂
This is too cute and the birthday boy looks very pleased! My MIL and I are both collaborating on a comforter for Elisha, so your post came just in time for us to get ideas from! Thanks for sharing!
Oh you’re welcome! Thanks for saying that! 🙂 I can’t wait to see yours when you’re done with it! 🙂
You can quilt too?! I’ve never tried! What CAN’T you do? Quilt looks great!
Thanks. I’m by no means a quilting expert! I’ve only made 3 counting this one. Thanks so much for your sweet comments! 🙂
Stopping by from Busy Bee Blog Hop – when I saw this, I couldn’t help but comment. You did a beautiful job! When my daughter was about 10 I had one of these made for her (I don’t sew at all) jeans on top and flannel on bottom. She will be 32 in 2 months, we have replaced worn out backing twice and patches have been added over the years to mark special interests (strawberry shortcake, gymnastics, NYPD etc) but that blanket shows no signs of wearing out and her son now snuggles with it at 1 year old. You couldn’t have made a better long lasting gift for your son!
Aaw, thank you so much for saying that. I like the idea of making an “heirloom” if you will. And I wouldn’t have thought to add patches, that’s a great idea! Thanks!
~Jen
What a lovely heirloom gift. I’m inspired to try out a jean project for myself now. Belated Happy Birthday to your son. 🙂
Thank you so much Joanne! 🙂
What a great project! Happy Birthday to your son!
Thanks Sharon! 🙂
Awww, this is great! Happy Birthday to your 8-yr. old. 🙂
I’m visiting today from Linkin’ w/my Ladies.
Thanks Rosey! I’m so glad you stopped by! 🙂
~Jen
The picture of your son opening up his present is adorable! He looks absolutely thrilled. Nice job on the quilt and kudos to using what you had available instead of heading to the store. Really enjoying your posts!
Beth
Thank you Beth!
I have so many thrift store or garage sale purchases cluttering up my sewing room, that I’ve vowed to try to use some of it up in lieu of buying new, whenever possible. It worked out great, because I was also feeling too lazy to go to the store anyway! 😉
Thanks for your sweet comments! I consider you a refashioning queen, so your compliments always make my day! 😉
~Jen
I love this! You always manage to quickly whip out a project that I’ve had on the back burner for years! I think I’ve been saving jeans for a quilt for about 5-10 years! I started cutting them out last summer. Wow! That’s a lot of work! I can’t believe you pulled it together so fast – you amaze me!
Thanks! Honestly, I saved up jeans (with the intention to make a denim quilt) for several years before I finally got around to making one. Each of the 3 quilts I made, I waited until the last minute to get started. This one only took me 2 days, but I was up until 6:30 am the first night, and never went to bed at all the second night! I didn’t want to work on it while my son was awake, so I waited until he went to bed and wound up staying up too late. I should’ve started it a week earlier than I did. (oops). Maybe eventually I’ll learn to stop procrastinating! 🙂
Thanks for your sweet comments!
~Jen
i nominated you for the very inspiring award blogger award. im not entirely sure of the depth of this award but i wanted to pass the love that someone blessed me with on to you because you inspire me all of the time. heres the details:
http://sincerelywhitney.com/2013/03/28/blogger-nominations-very-inspiring-versatile-blogger/
Wow! That is so sweet! Thanks Whitney! 🙂
I’m glad to see that using the back fabric as the binding worked out for you!! It turned out cute!
Thank you! 🙂
Thanks for linking up at Gingerly Made’s Show & Tell party. You’ve been featured!!
http://www.gingerlymade.com/2013/04/show-tell-features.html
Yay! Thanks Ginger! That made my day! 🙂
~Jen
Congrats on the feature @ Gingerly Made! I’d have picked you too:)
Aaw, thanks Amy! 🙂 You’re so sweet! 😉